The takeaways from my previous feature were that living with a sealed 32GB internal storage was do-able, with a little management, that the Lumia 830 with 16GB plus microSD was in the ideal position all round, but that work was also needed for the vast majority of Windows Phones, most with 8GB internal disks and microSD expansion. This feature deals with the latter, obviously.
[If you have one of the very few Windows Phones with 4GB internal disk (e.g. HTC 8S) then just give up now. Put it in a drawer and go buy yourself something - anything - decent.]
Content types
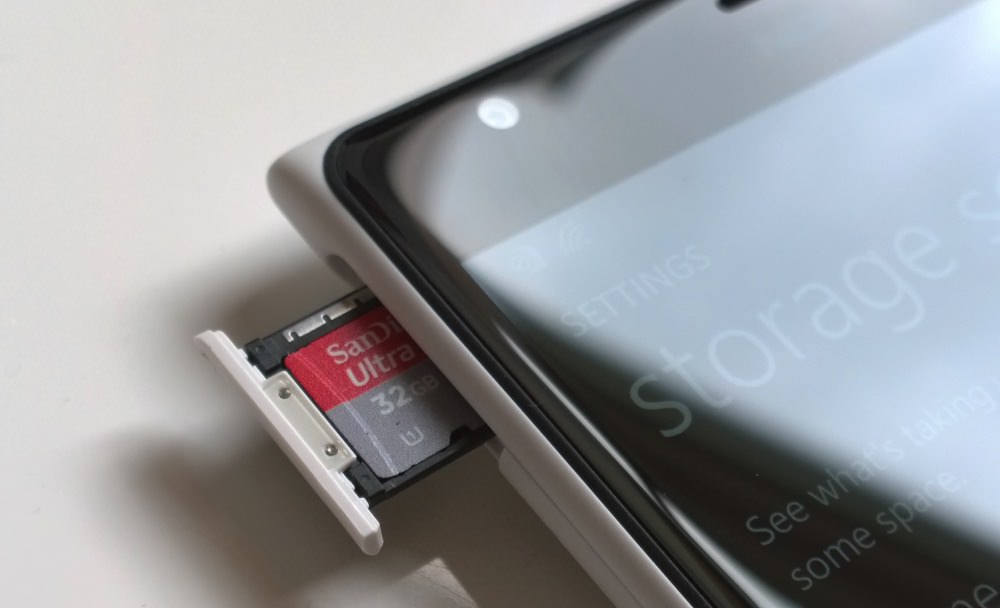
So, although I'm actually using a Lumia 1520 for these screenshots, let's slum it a little and assume that you have a typical 8GB plus microSD device. What should you and shouldn't you store on each part of your storage, and what are any downsides? In fact, Windows Phone itself helps break down your content into four types:
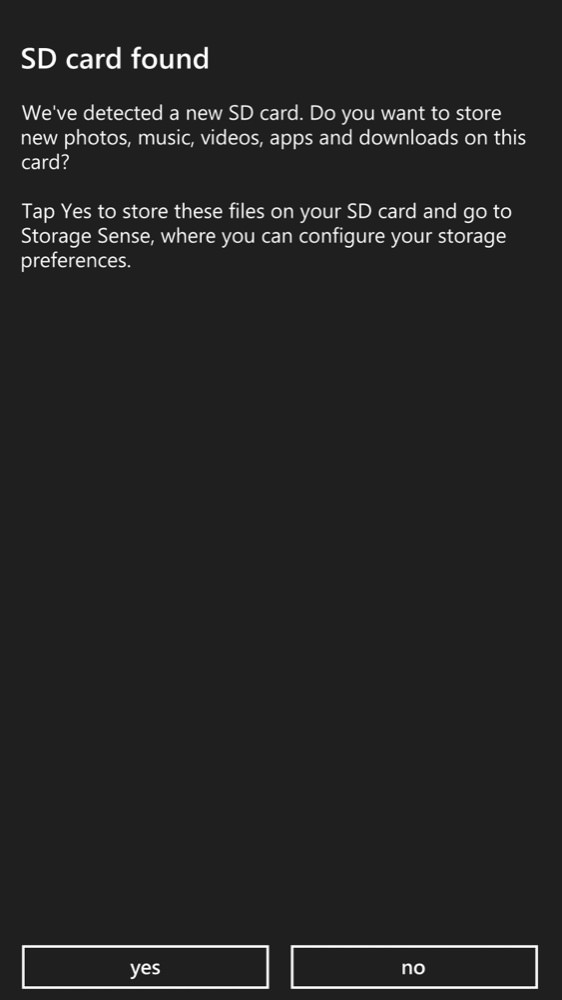
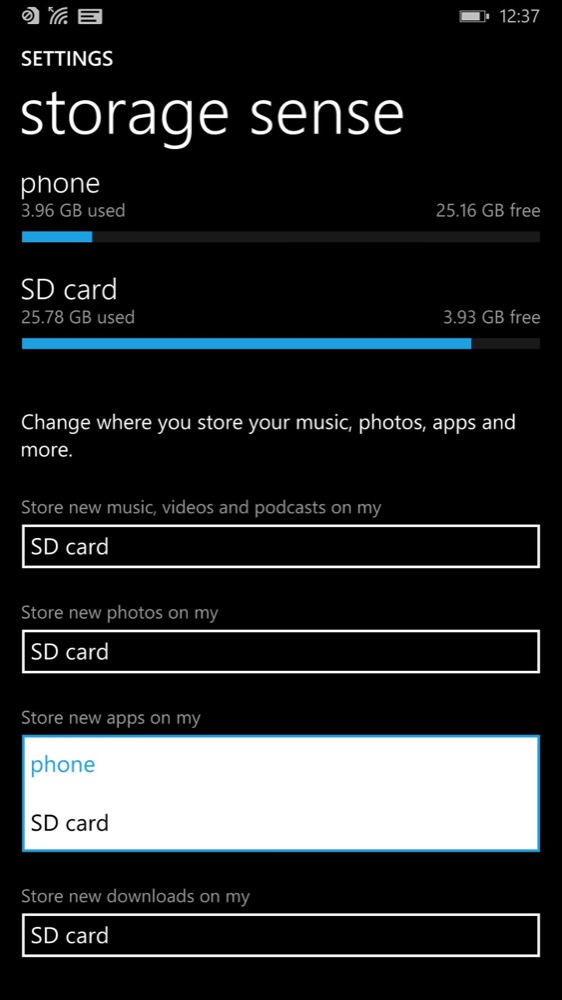
Having detected that you've inserted a microSD card, you're helpfully prompted to start allocating content types to it. The breakdown, as shown above right, is:
- Music, videos and podcasts
As it sounds, new downloaded media of all types will be saved into appropriate folders on your card, though note that existing content on your internal disk won't be moved over automatically (that's a job for you in, for example, Files)
It should also get you thinking as to the best way to get your other media (e.g. from your desktops) onto the card in the first place. You can follow Windows Phone's lead in terms of folders and storage here - I'd recommend loading up your media library with a SD card reader accessory for your desktop or laptop, but you can also drag and drop over a cable from a Windows Desktop.
There's no downside to storing media on expansion card - other than, obviously, losing access if you take the card out later. So, especially on an 8GB device, aim to manually move over any existing media and then make sure all future podcasts and purchased media end up where they belong - on extra silicon.
- New photos
Again as the name suggests, any new photos (or captured videos) from this point onwards will end up on the 'SD card' if this is selected. Whatever else you do or don't pick from the advice on this page, make sure that this one is abided by - an expansion card is PERFECT for captured photos and videos. For two reasons. Firstly, however many you take, and however long or large your video captures are, you're much less likely to run out of space (see my musings on card capacity below). Secondly, you have the absolute last resort, in the event of necessity or even your phone packing up completely, of just removing the microSD card and accessing the photos on another device. You won't do this often, I suspect, but it's a wonderful mechanism to know you can fall back on.
As with general media, there's no downside of picking this option. For devices like the Lumia 930, with its 4K video capture, you'll want to make sure that you're using a very fast (Class 10 and above?) card, but for most people, photos and videos, quite simply, are a perfect fit for being created on card rather than clogging up internal storage.
- New applications
Things change slightly with 'apps', as you might perhaps expect. On a '8GB internal' device you may be left with no choice but to install all applications to card, of course, but SD card issues (see below) mean that it's not always a great idea to install everything on expansion card. An 'app' that's installed internally is there for good, one that's installed to card is at the mercy of any SD card messing around you might do. And there's no easy way to select an installation destination when you grab something from the Store.
My rule of thumb is to leave this set to 'Phone' while I get set up with all my core applications (you know, Twitter, Photo editors, streaming media apps) and then change the setting in 'Storage Sense' to 'SD card' when putting on all my favourite games. These often run into the hundreds of Megabytes and all of this can be put on the card, where you'll have the luxury of almost unlimited space. And then perhaps change the setting back afterwards - how it's left will depend on what you plan to install next and how much room you still have on the internal storage.
- New downloads
This mainly refers to non-media files you grab for viewing in Internet Explorer or similar and, given that you might just be tempted to download 'that' 50MB PDF file (etc.) then it's a good idea to have this set to 'SD card' as a matter of course.
Possible problems
When you first insert a microSD card, there's a curious dialog that pops up (below, left) - it turns out that a set of applications on card is locked to a specific phone and that you can't just swap cards around. This is perhaps due to technical restrictions in terms of each phone keeping track of what applications it has installed, but just as much to do with preventing piracy, especially in the budget realm. You can imagine the scene in the school yard: "Hey, Dave, want to swap cards for the week? My card has FIFA and Real Racing (etc.) installed!"
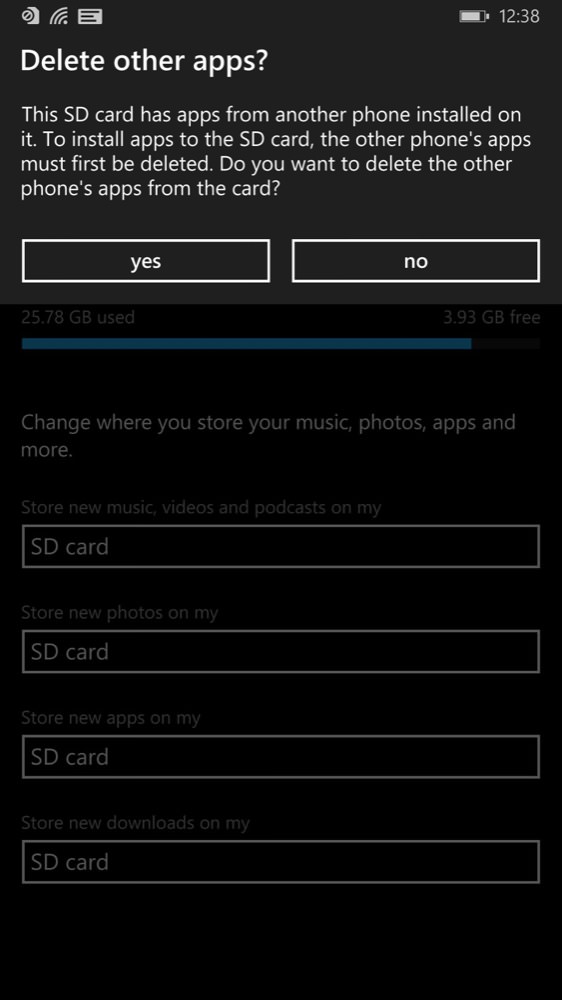
For most users, of course (especially honest ones!), this won't be an issue at all, since you'll own all your own cards and are unlikely to do much card swapping. And if you do then it'll be with the same base smartphone.
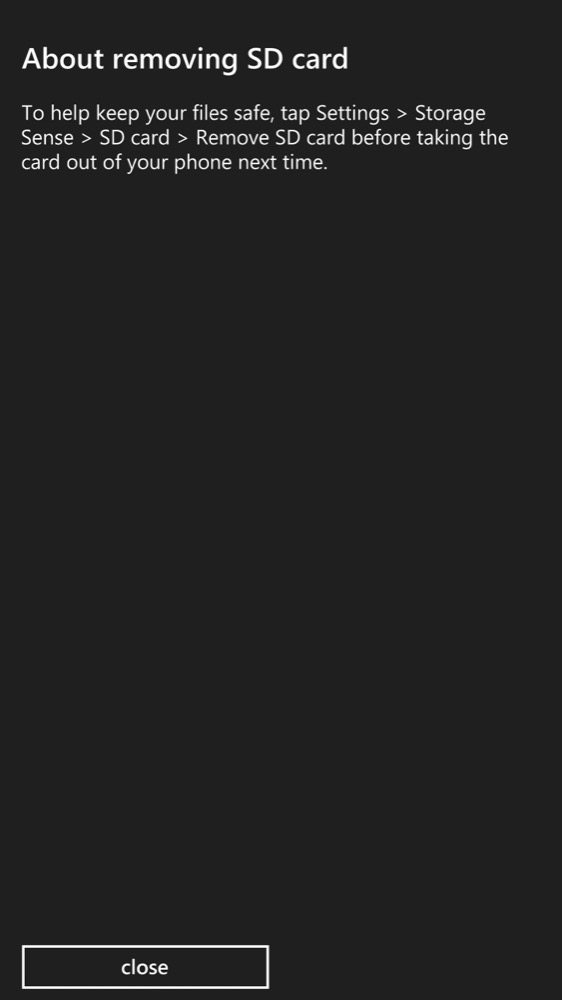
The other dialog, shown above right, is critical to note. You can't just remove a microSD from a smartphone. Or indeed a USB memory stick from a laptop - it's the same principle. Operating systems like to keep files open on card, you see, and it's important to 'remove' them in software before physically spring-ejecting them in hardware. Again in Storage Sense, in case you're wondering.
Now in most cases in the computer world, you can get this wrong, i.e. forget about the dismounting of the storage and just yank out the card or stick, and the files will be fine - you have to be quite unlucky to hit a disk corruption of some kind. However, Windows Phone uses microSD rather more intimately than other OS and using the software 'remove' function is absolutely critical.
Above, right is the warning, and it's possible that you may indeed be OK. But, in testing for this feature, I experimented yanking out a card from my 1520 without warning - and immediately hit a problem. With the card out, applications that I'd installed on it were shown as 'unavailable' (shown below, left) - this is to be expected. But, re-inserting the card didn't change the label in the main application. I waited for a while and then tried tapping on it anyway, with the message shown below, right:
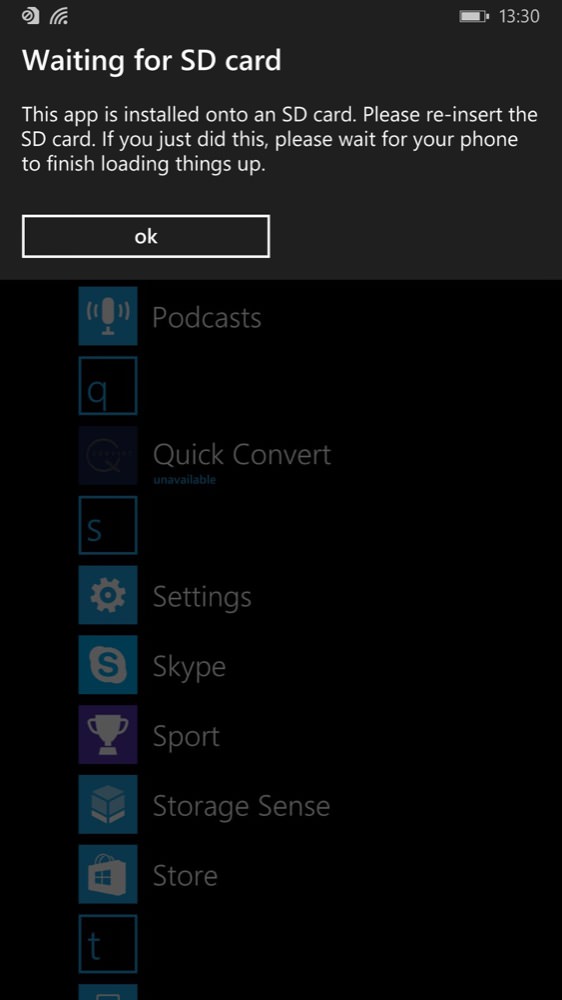
The pop-up implies that, after a while, the OS will rescan the file system and discover that the application is available again, but I waited 24 hours(!) to no avail. I also tried restarting the phone. Again, still shown as 'unavailable'. So it seems as if something about the application's entry in the OS is corrupt, as a result of forcibly removing the microSD without 'removing' it first.
So there we have first hand evidence that you have to handle expansion cards properly. In this case, the cure for regaining use of the application was to long press the entry and choose 'uninstall' - this, thankfully, still worked, and I was able to reinstall it from the Store. But, of course, disk corruption could have been worse, perhaps losing access to other content - you have been warned!
What capacity microSD card should I get?
For most people, I'd suggest a 32GB card as a bare minimum. Don't think for one moment 'That sounds like a lot, I'll never use it!' You will, and when you get over the 50% mark (i.e. 16GB), a few weeks in, you'll thank me. You see, memory cards are now incredibly cheap, a 32GB card is £10 or so, there really is no point whatsoever in getting a 16GB in 2015. In fact, I'd strongly recommend that everyone gets something like this 64GB card, now available for under £20 on Amazon (other suppliers are available, but make sure you get the real thing and not some clone of a big brand!). This 'feels' like the sweet spot in terms of price per Gigabyte nowadays. And it instantly:
- doubles the storage of the Lumia 1520
- quadruples the storage of a Lumia 830
- multiplies the storage of the 'standard' 8GB internal Windows Phone by a factor of eight
All at relatively little cost.
How do I upgrade to a higher capacity microSD?
Good question. Unless you're starting with something trivial (like a 2GB card) then it'll be impractical to do the 'upgrade', i.e. the copying of all the files over, on the phone itself. What you need is a laptop with a SD card slot or a SD-to-USB adapter (also trivially cheap online), plus a microSD-to-SD sleeve (this normally comes with each card). As you might imagine, the upgrade involves:
- Safely 'remove' the old card in Storage Sense (swipe to the bottom and you'll see the option).
- Physically remove the card and insert it into the adapter combination of your choice into a laptop or desktop.
- Make a new folder on the latter and copy the entire contents of the microSD into it. If you're not 100% sure about copying folders across on a desktop OS then seek help from a friend.
- Insert the new card into your phone. Check it's showing the right free space. Best do this first, in case there are any formatting issues (solving which are an entire article by themselves!).
- Safely remove ('Eject') the old card from the laptop/desktop's adapter.
- Safely remove the new card from your phone and insert it into the adapter in your laptop/desktop.
- Copy across the folders from your backup folder.
- Safely remove ('Eject') the new card from the laptop/desktop.
- Insert the new card into your phone.
If that sounds a bit tortuous then it's really not. I'm just spelling things out so that everything goes smoothly for you!
The Windows Phone should, after a few seconds, find all its old files and the only difference will be that Storage Sense tells you that you have a whole heap more free space!