From the blog post:
The camera we’re attaching to the Raspberry Pi is a 5MP (2592×1944 pixels) Omnivision 5647 sensor in a fixed focus module. This is very typical of the kinds of units you’d see in some mid-range camera phones (you might argue the lack of autofocus is a touch low-end, but it does mean less work for us and you get your camera boards sooner!). Besides power, clock signals and so forth, we have two principal connections (or data buses in electronics parlance) between our processor (the BCM2835 on the Pi) and the camera.
The first is the I2C (“eye-squared-cee”) bus which is a relatively low bandwidth link that carries commands and configuration information from the processor to the image sensor. This is used to do things like start and stop the sensor, change the resolution it will output, and, crucially, to adjust the exposure time and gain applied to the image that the sensor is producing.
The second connection is the CSI bus, a much higher bandwidth link which carries pixel data from the camera back to the processor. Both of these buses travel along the ribbon cable that attaches the camera board to your Pi. The astute amongst you will notice that there aren’t all that many lines in the ribbon cable – and indeed both I2C and CSI are serial protocols for just this reason.
The pixels produced are 10 bits wide rather than the 8 bits you’re more used to seeing in your JPEGs. That’s because we’re ultimately going to adjust some parts of the dynamic range and we don’t want “gaps” (which would become visible as “banding”) to open up where the pixel values are stretched out. At 15fps (frames per second) that’s a maximum of 2592x1944x10x15 bits per second (approximately 750Mbps). Actually many higher-end cameras will give you frames larger than this at up to 30fps, but still, this is no slouch!
One item of trivia here is that the VideoCore IV GPU used in this Pi camera project, the BCM2835, is exactly the same GPU as used in the Nokia 808 PureView. Small world, eh?
Even more fascinating is the description of what happens at the pixel level, with the author, David Plowman, taking about Bayer patterns and the algorithms needed to convert this coloured mosaic into usable image information:
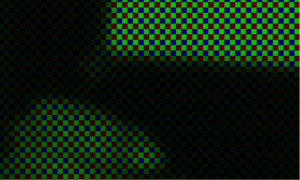
Yes, it is imaging’s inconvenient truth that fully two-thirds of the colour values in an RGB image have been, well, we engineers prefer to use the word interpolated. An image sensor is a two dimensional array of photosites, and each photosite can sample only one number – either a red, a green or a blue value, but not all three. It was the idea of Bryce Bayer, working for Kodak back in 1976, to add an array of microlenses over the top so that each photosite can measure a different colour channel. The arrangement of reds, greens and blues that you see in the crop above is now referred to as a “Bayer pattern” and a special algorithm, often called a “demosaic algorithm”, is used to create the fully-sampled RGB image. Notice how there are twice as many greens as reds or blues, because our eyes are far more sensitive to green light than to red or blue.
The Bayer pattern is not without its problems, of course. Most obviously a large part of the incoming light is simply filtered out meaning they perform poorly in dark conditions. Mathematicians may also mutter darkly about “aliasing” which makes a faithful reconstruction of the original colours very difficult when there is high detail, but nonetheless the absolutely overwhelming majority of sensors in use today are of the Bayer variety.
The fact that such demosaic work is needed does give a clue as to one reason why there might be artefacts in a photo taken on a small-camera-ed smartphone, of course - deep down every image is, by definition, a mass of mosaic 'artefacts'!
So, even on a smartphone camera like the N8's, which is widely considered to have very little image processing applied, you can see that at the hardware level, there's still just as much work needed as on lesser smartphone cameras.
The only slightly special case I can think of is the Nokia 808 PureView, referred to above, where each of the 'pixels' in a 5 megapixel output photo are effectively the result of processing the raw data from up to eight hardware pixels, i.e. there's still demosaic-ing to be done, but it's just one small step in producing the 808's 'super-pixels', estimated by me to be around 4 microns large, and with their data used as genuine RGB 'pure' dots in each output photo.
Fascinating hardware insights from the Pi team anyway. And if this was all too geeky for you then move on, nothing to see!